
Our ultimate guide to keeping your Facebook account secure
Ensuring you Facebook account is as secure and private as it can be is one of the most effective things you can do to keeping yourself safe on the Internet.
A secure Facebook account means you’re far less likely to have your account compromised, and far less likely to be targeted by a number of different online crimes, including identity theft.
Of course, Facebook is a myriad of different settings and it can be confusing, especially when they’re moving all of those settings around. So we’ve compiled this easy to read, 5-part guide that includes all of those settings that are the most important to get right in 2021.
– Part 1. Set your account to Friends Only
– Part 2. Hide Your Friends List and Look-Up Contact Details
– Part 3. Hiding your About information
– Part 4. Reviewing Tags
– Part 5. 2FA
We recommend doing this on Facebook for Desktop since some of the settings can be a little fiddly, but we have included instructions for the Facebook app as well.
Part 1. Set your account to Friends Only
This is the main privacy setting on Facebook. It dictates who can see what you post. This includes written posts (aka status updates), photos, your check-ins and your shares. It is important you set this to Friends. This prevents strangers from going to your profile and seeing the information you post.
For Facebook for Desktop…
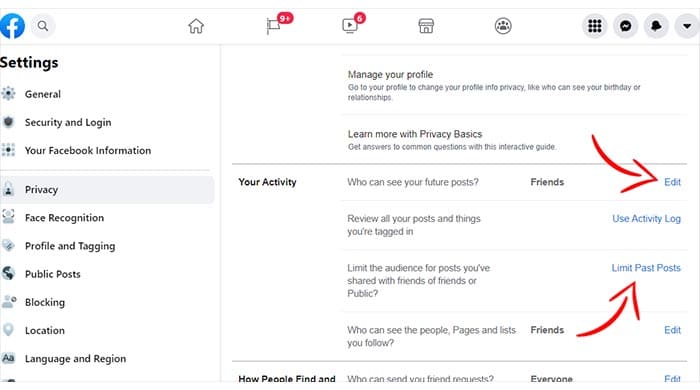
Go to Facebook and click the down arrow at the top right hand side of the screen and click Settings & Privacy. Then Settings. Then select Privacy. Then select Who can see your future posts? Make sure this setting is set to Friends. In the same section, go to the Limit the audience for posts you’ve shared with friends of friend or Public? option and select Limit Past Posts. This will make sure anything you’ve shared in the past also has the Friends Only privacy applied. See the image below.
For the Facebook App…
Open the Facebook app and click the three-lined icon. Select Settings & Privacy. Then Settings. Then scroll down to Posts under the Audience & visibility section. Then select Who can see your future posts? Make sure this setting is set to Friends. In the same section, go to the Limit the audience for posts option and select Limit Past Posts. This will make sure anything you’ve shared in the past also has the Friends Only privacy applied.
Sponsored Content. Continued below...
Part 2. Hide Your Friends List and Look-Up Contact Details
There are a few more settings in this same section that also need to be changed.
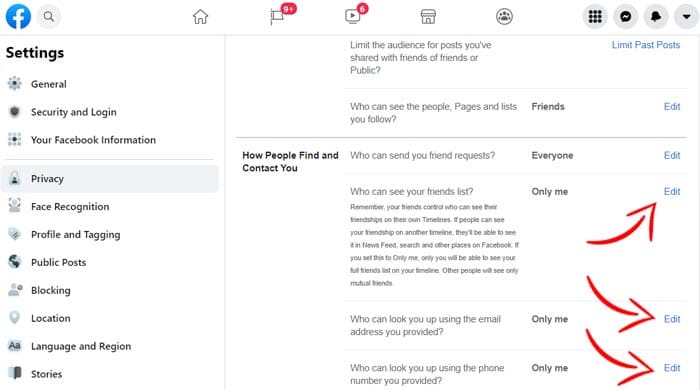
First, make sure the Who can look you up using the email address you provided option is set to Only Me, and the Who can look you up using the phone number you provided is also set to Only Me (Facebook have a tendency to reset this to Everyone now and again.) Finally you can also set the Who can see your friends list? is set to Only Me.
For Facebook for Desktop…
These settings are all in the same section as the settings you changed in Part 1. See image below.
For the Facebook App…
Open the Facebook app and click the three-lined icon. Select Settings & Privacy. Then Settings. Then scroll down to the How people can find and contact you setting under the Audience & visibility section.
Sponsored Content. Continued below...

Part 3. Hiding your About information
Facebook asks us for certain information about us. This can include where we work, our contact address, our city or hometown, where we studied, our date of birth, our relationship status and our email address.
Firstly, unless there are mitigating factors, we don’t recommend offering up most of this information. Even with the appropriate privacy settings, there is always a risk it can fall into the wrong hands. And there really is no reason why you need to give Facebook this information in the first place. Especially your address, hometown/city, place of work and place of study. Our recommendation – don’t enter it, and delete it if you have already.
Either way, what information you do have here should be visible to Only Me, with perhaps some exceptions like your relationship status and birthday (but not your birth year) which could be set to Friends. Needless to say, nothing here should be available to everyone.
For Facebook for Desktop…
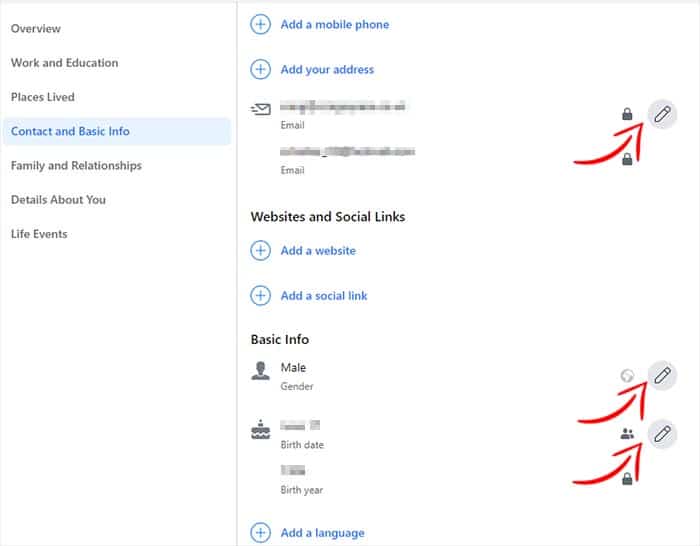
Head over to your profile page and click About underneath your cover photo. You can browse each section here and check what you’re sharing and who you’re sharing it with. A padlock icon means the information is only being shared with you. Click the pencil icon (see image below) to edit each piece of information.
For the Facebook App…
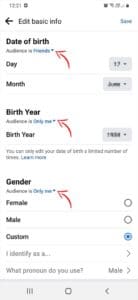
Go to your profile page and select See your About info underneath your profile picture. This lets you see each section where you can select Edit to make changes. From there you’ll see each section has a Audience is option underneath the section title which can be used to change the privacy of that information. (See image below.)
Part 4. Reviewing Tags
In Part 1 we discussed your main privacy setting that controls the visibility of what you post on your profile. We recommended you have this setting as Friends so only your friends can see what you post. There is one exception to this rule – tags.
When you post something, for example a photo or video, by default your friends can tag other people in that post. This widens the visibility of your post to also include the friends of anyone tagged in it. Consequently this can mean people you’re not friends with can see the post.
However you can enable the review tags settings so you can review any tags people make on your posts before they widen the visibility of the post.
For Facebook for Desktop…
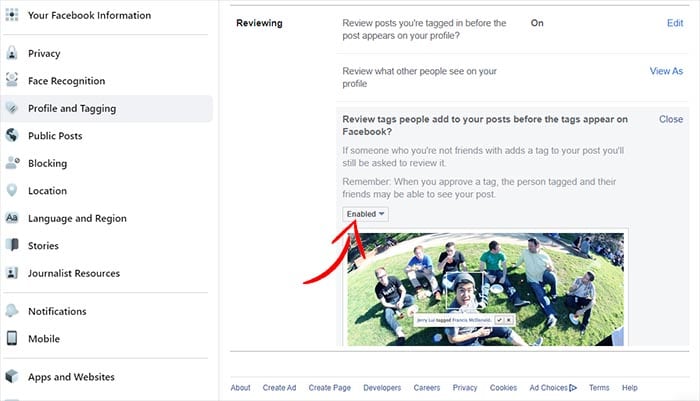
Go to Facebook and click the down arrow at the top right hand side of the screen and click Settings & Privacy. Then Settings. Then Profile & Tagging. then enable the Review tags people add to your posts before the tags appear on Facebook? setting. See image below.
For the Facebook App…
Open the Facebook app and click the three-lined icon. Select Settings & Privacy. Then Settings. Then scroll down to Profile & Tagging. under the Audience and visibility section. Then enable the Review tags people add to your posts before the tags appear on Facebook? setting.
While you are in this section, we also recommend enabling the Review posts you’re tagged in before the post appears on your profile? option. This is the closest Facebook users can get to prevent themselves getting tagged in other peoples content. It doesn’t prevent the tag, but it does prevent tags appearing on your Facebook timeline until you approve the tag.
Sponsored Content. Continued below...
Part 5. 2FA
2FA – or two-factor authentication – is one increasingly important security step that we strongly recommend enabling. It means that someone trying to access your Facebook account will need more than just the account password to gain access. They will also need an additional level of authorisation.
In most cases this means either a code sent via SMS to your phone or a code produced by an authentication app on your mobile device.
For Facebook for Desktop…
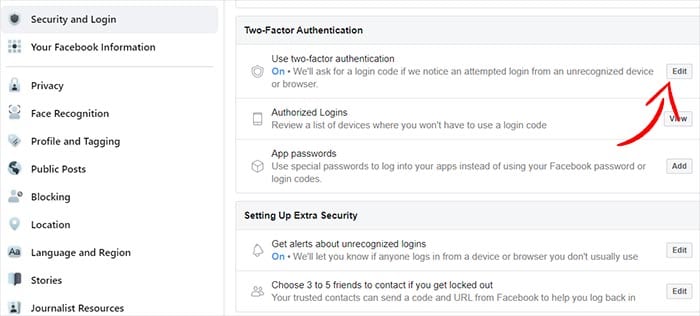
Go to Facebook and click the down arrow at the top right hand side of the screen and click Settings & Privacy. Then Settings. Then Security and Login. Then under Two-Factor Authentication select Use two-factor authentication. (See image below.) You will have an array of options and we recommend using an authorisation app. We have instructions on how to set that up here.
How to use a 2FA authenticator app with your Facebook account
For the Facebook App…
Open the Facebook app and click the three-lined icon. Select Settings & Privacy. Then Settings. Then click Password and security. Then scroll down to Two-Factor Authentication select Use two-factor authentication. You will have an array of options and we recommend using an authorisation app. We have instructions on how to set that up here.
How to use a 2FA authenticator app with your Facebook account
There are plenty of other settings we recommend keeping tabs on (you can see some others here) but these are the most important settings that will keep your Facebook account private and secure.