Facebook is a labyrinth of privacy settings. Without getting too deep into it, we outline 5 important settings that are important to get right
This includes your posts and photos, your friends list, your About information, reviewing tags and Facebook’s Off-Facebook Activity setting.
The most important privacy control is the setting that controls who can see what you post on Facebook by default. This includes your posts and the photos you choose to upload.
It’s vital you get this right. If you don’t, any stranger can glean information from your account. And any information can potentially put you at risk to some type of online scam, even if you think the information is harmless.
On desktop, click the top right arrow, select Settings and Privacy, then Settings, then scroll to the Privacy option on the left side and set the Who can see your future posts? option to Friends. (see below.)


If you’re using the Facebook app, select the three lined icon from your profile, then Settings and Privacy, then Settings, then Privacy Settings and set the Who can see your future posts? option to Friends.
You’ll also see a Limit Past Posts option on the same page, which will set all your past posts as well. It’s important you do this as well.
Sponsored Content. Continued below...
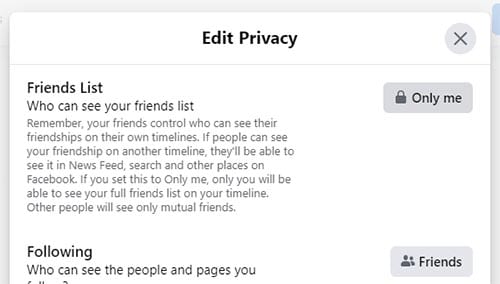
Hiding your friends list prevents strangers from easily checking who you’re friends with on Facebook. Why is this important?
Because it helps prevent cloning scams. This is where a scammer checks out your profile and makes a new, duplicate copy of your account. Often this is as simple as creating a new account with your name and profile picture (both of which are visible, even to strangers.) Then they send friend requests to all your friends in an attempt to trick them into accepting. (More on cloning scams here.)
Of course, if you hide your friends list, the scammers won’t know who to send requests to. As such your account is far less likely to be cloned. (It’s also less likely to be cloned if you follow the above point as well!)
On desktop, click the top right arrow, select Settings and Privacy, then Settings, then scroll to the Privacy option on the left side and set the Who Can See Your Friends List? option to Only Me.


If you’re using the Facebook app, select the three lined icon from your profile, then Settings and Privacy, then Settings, then Privacy Settings and set the Who can see your future posts? option to Friends.
Facebook gives you the opportunity to add information about yourself, including contact information. This information should not be public, and we recommend setting it to Only Me. (After all, your friends probably have your email and phone number, right?)
To head to these settings, on desktop from your profile click About and then Contact and Basic Info. On the right hand side of each piece of information there is an icon denoting the privacy. It should be a padlock, with means Only Me! If it’s not a padlock icon, click it and it can be changed.
If you’re using the Facebook app, select the three lined icon from your profile, then Settings and Privacy, then Settings, then Personal Information and then Contact info. Here you can change those settings.
We don’t recommend giving Facebook your postal address. If you have entered it, this should be set to only me as well.
Sponsored Content. Continued below...
You can’t stop others from tagging you on Facebook, which really is a setting Facebook should have. After all, we really should be in control of what content we’re associated with on Facebook. However you can stop a tag (e.g. when you’re tagged in an unwanted photo or post) appearing on your timeline until you approve it.
We should make it clear that this is not the same as preventing someone from tagging you. Even before you review the tag, you’re still tagged, and it can appear in other places on Facebook, such as the news feed.
However the tag will not come up on your timeline until you approve it. The way to think of this setting is that it reduces the visibility of the tag.
On Facebook for desktop, click the down arrow, select Settings & Privacy, then Settings, then Profile & Tagging and enable the Review tags you’re tagged in option.
On the Facebook app, select the three line icon, select Settings & Privacy, then Settings and then Profile & Tagging option and enable the same option.
Facebook will always, to some extent, be able to track you in order to show more personalised adverts. That is, after all, their primary business model. However you can limit what Facebook knows about you, especially when it comes to your surfing habits outside of Facebook.
The Off-Facebook Activity setting, enabled by default, allows Facebook to get information about you from other sites and pair it with your account. You can stop that from happening by going to this option (if you’re on the app, go to Settings & Privacy, then Settings, then Off-Facebook Activity and then Manage.) You may be prompted by Facebook to re-enter your password (a sure fire way of knowing Facebook doesn’t want you messing with the option.)
Thanks for reading, we hope this article helped, but before you leave us for greener pastures, please help us out.
We're hoping to be totally ad-free by 2025 - after all, no one likes online adverts, and all they do is get in the way and slow everything down. But of course we still have fees and costs to pay, so please, please consider becoming a Facebook supporter! It costs only 0.99p (~$1.30) a month (you can stop at any time) and ensures we can still keep posting Cybersecurity themed content to help keep our communities safe and scam-free. You can subscribe here
Remember, we're active on social media - so follow us on Facebook, Bluesky, Instagram and X